30 August 2013

copy cat

Here's a throwback "Liar's Club" post.
Let's see how many pictures it takes to figure it out.
PERICH copycat ENGINEERING


First off what was needed was a template.
Man I've gotten a ton of use out of that little bandsaw!
aluminum


Well this should give it away by now.
I needed this as the owner wouldn't give up the real thing!
template


This design is basically a ripoff of an existing style.
They never made one to fit this model.
double template


Armed with a series of templates,
the design was layed out on aluminum plates.
red


Here's the ugly stage.
This was considered the prototype,
so the design was more of a copy of the little original.
hack


Aluminum is really easy to file,
and in no time the pieces were cleaned up.
Who needs a stinkin mill!?
framed


Holes were mapped out,
and the hardware from the original was recycled.
drillium


Can't forget the PERICH stamping.
Now it was time to wait to see if this would fit the real thing.
custom aluminum guard


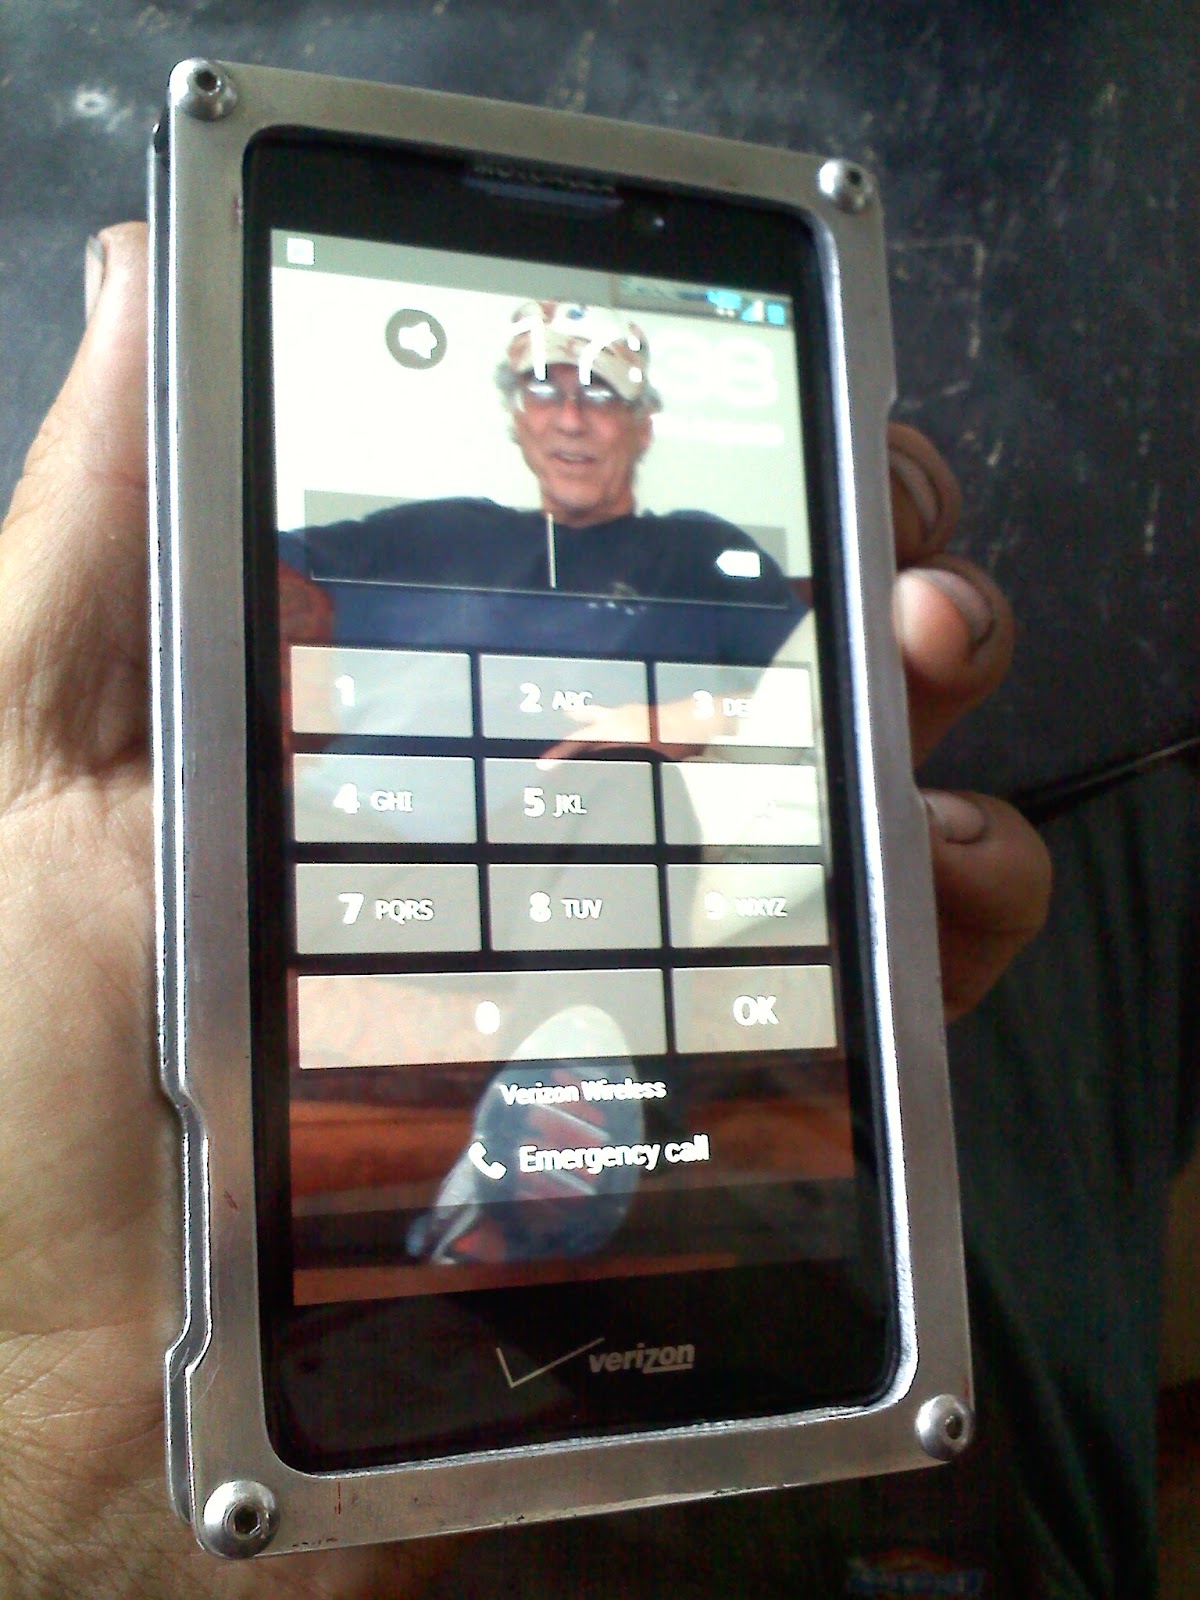
If you haven't figured it out yet,
here's the finished product.
razr maxx aluminum guard


ching...ching...ching...
A simple aluminum guard or bumper for a droid type phone.
Razr Maxx aluminum bumper


A friend Aaron loves this phone,
and his wife had the aluminum guard for her Iphone.
Motorola Razr Maxx aluminum bumper


We were lucky that the phone fit almost perfectly.
The sides of the phone are wedged,
not squared like the iphone,
so there was a bit of concern that it would hold without slipping.
RIP - Richard Vandemark - AZ


Aaron liked the design,
and didn't mind the beater finish,
so looks like this is going into full-time duty.
Fun to do little project like this!

TP

stool time - overhauling brakes

With the Ventura Nationals coming up this weekend,
it was long ago obvious the green 40 wasn't gonna be a driver.
Too many things on the STD list to rush it,
and the one thing out of my control - the driveshaft,
is still not finished.
stool time


That doesn't mean I'm not chipping away at it every evening.
The rear brakes were questionable,
time to bring out the stool.
ford 8 inch bendix brake


When measuring up the brake lines,
I noticed the bleeder bolt had been twisted off,
the threads jammed into both wheel cylinders.
At $10 a pop,
this was an easy decision to swap out rather than rebuild.
seized ford wheel cylinder


This was a typical $100 craigslist 8" rear end,
with the good old "just was pulled" story.
There was no way this guy had any rear brakes!
A little seized up.
overhaulin'


There's quite a bit going on underneath that drum.
The emergency brake is a tricky mechanism,
and I had to open up the other side to copy how to put it back.

Here's a picture of the underside if anyone is ever in a bind.
It's easy after the first one.
ford 8"  bendix + emergency brake setup


The passenger side was a simple dry overhaul.
The driver side a little trickier.
The rear seal had leaked enough to pickle the entire system with oil.
A little diesel cleaned everything up no problem...
fire - degreasing oily brake shoes


But what about the oil soaked shoes?
There was enough meat on them to last a couple thousand miles,
so I decided to pull a old trick out of the hat.
Here's a quick "how to" - degreasing oily brake shoes.
holey chit - dry brake shoes!


Very easy.
Brush or spray some kind of solvent cleaner
- acetone, brake spray, moonshine hooch...gas...
and clean up the majority of the oily dirt.
While they're still moist,
light them on fire!
Wipe and repeat a couple times,
and wow - you got some clean dry brake shoes!
1940 ford coupe


You think not the most earth friendly way to do this?
Less emissions than driving down to the parts store,
and buying some cardboard + plastic packed new shoes sent from China.
Right?
Ok before everyone's panties are in a bunch,
here's a couple cute kid pictures to distract ya...
grease monkey Macey - 2013


There was a miss when running the engine,
and Macey found out there was a cracked spark plug.
I seriously couldn't keep her away from that engine!
She's gonna be trouble that's for sure.
Macey James Perich - 2013


Until next time...

TP

29 August 2013

murdered out

Yesterday Jakob finally finished (one of) his summer projects.
Jakob Perich - 2013


You'd think it wouldn't be hard to do a murdered out paint job.
He did take it all apart and smoothed out the old yellow.
Not the kid-like spray black over everything.
smooth


He did call in the professional rattlecanner.
skills


What form!
A Sherwin-Williams flat black was used,
one of the better finishes and really strong paint.
Now let's slap it all back together right?
not shiny


Well there's always something.
This was an older complete REDLINE BMX bike
and they used a proprietary Big Block crank set.
Redline Big Block cranks and pedals


When he took it apart,
all the ball bearings fell out.
I figured the bearing cage had disintegrated.
Good thing he kept everything,
as these vintage cranks take a special hard to find bottom bracket.
It's much larger than your typical schwinn style one-piece cranks.

After weeks of no luck at the local bike shops,
we ended up reinstalling the cageless ball bearings.
Wow what a PITA!
Grease and a couple magnets definitely helped out.

Jakob's murdered out Redline BMX bike


Definitely proud of Jakob for pushing through and completing his project.
It's really dialed in compared to before.
He was so stoked to take the first ride.
Jakob - 2013


Now both kids will be ready for the first week of school.
They each have 2 or 3 bike to choose from.
No excuses having flats or broken chains...

TP

27 August 2013

custom wheel truing stand

Jaxon's been taking charge and respoking his bike wheels,
and somehow he's gotten lucky making them decently true.
scrap


The other day he was wrenching on the couch,
with the rim in his lap.
For some reason I had thought he was putting them together
on an upside down bike frame or something.
custom wheel truing stand


This particular rim wasn't going together easily,
and it was obvious he was in need of some type of truing stand.
Good thing we don't throw anything away!
The old fork they had cut off a stingray last year,
and some thick steel scrap,
is now the perfect 20" stand.

Waste not want not!

TP

26 August 2013

swirl prediction

The green 40 project took a back seat this weekend,
as the wife and kids returned back from their trip to Camarillo early.
I had considered driving Chief up there,
and then busting butt on the 40 to try and drive it too.
A great idea but not very realistic,
which made it a great idea!
custom 1940 ford dash


Instead I buttoned up a couple other responsibilities,
and hung out in front of the TV for a little bit.
What can I say we are in the netflix trap.
This got me to thinking about that dash insert for the rusty 40.
spiral layout


A couple layouts were sharpied on to the aluminum plate,
and each one wiped off.
Either not symmetrical or too trendy.
I'm not a great line drawer,
especially if distracted by craziness on this True Blood show we were watching.
hammer time


Finally a spiral idea was roughed out,
and it was something simple enough to draw,
without needing to get into too much detail for the amount of area.

Little did I know that this swirl pattern would predict the future.
The next day our toilet had multiple flushing problems.
Good times...
engraving chisel


I'm not experienced at hand stamping or engraving,
and this was probably not the best thing to start on.
A couple test lines and swirls were hammered out,
using a custom ground pointy chisel punch.
There was no going back after the first couple smacks.
macey watching progress


This was one of the harder things I've done in a while.
The chisel line was about 1/8" wide,
and you can imagine how many taps this took to complete.
Each side took about an hour and 15 minutes.
I went in waves where I'd get the hang of it,
then I'd go a little numb and go a little off-line.
It reminded me of those polynesian tattoo artists.
tap...tap...tap...tap...tap...tap...tap...tap...tap...tap...tap...tap...tap...
engraved swirls


With a little time left in the day,
I started doing this shading thing with this pointy punch.
Not realizing that each line would now need to have a million little dots.
engraving


Once I did a couple lines,
the the whole thing needed the same shading.
The next morning I finished up the last bit.
holey chit


Here you can see this is not schooled work.
It's a hand drawn sketch using simple custom shop tools,
by a guy in a junk filled backyard.
Total respect now for professionals that do this.
TP's day at the office


My Mom dropped by that morning,
and she took a look at what was going on.
Of course she had to ask "are you smoking grass?"
Hey all I need is a big ole mug of home-brewed cranberry iced tea!
Really!
This stuff will make your teeth brown.
go-go juice


Finally time for a quick pass with 600 grit sandpaper,
and a go under the buffing wheel.
I've found that WD-40 is good for removing the rubbing compound or rouge,
also pushing the dark evenly into the newly made cracks.
hand rubbed


We were taking a lunch break,
and the kids noticed the cool reflection the aluminum gave.
Hey that was really just iced tea!
shiny


I told the kids I'd give them a dollar if they counted each line and dot.
They said maybe if this was the 80's when a candy bar cost 25 cents.
Little punks!
1,000,000 taps


Let's see how it looks on the dashboard.
Nope.
Let's grind every bolt head first.
I've been waiting to use these aluminum 1/4-20 fasteners forever.
button-head fasteners


The custom button-heads were way too big and shiny,
so a mini-swirl was hammered on the aluminum ones.
A bit OCD you could say.
engraving -  hot rod or hippy style?


Each hole had to be tapped,
and now that there was no screwdriver slot,
the bolts were rotated from the back side.
Nothing's easy around here.
screwed


I had to see what this was going to look like,
and some random gauges were put in place.
I've got to figure out what 7 gauges I'll be using,
even Jakob noticed there were dual ammeters.
custom 1940 ford dashboard insert


Speaking of Jakob.
He was drawn to all the tapping commotion.
Was it the fun in making noise or the outcome or both?
Bee to the flower or moth to the flame!?
Jakob Perich - engraver - 2013


He whipped out this cool keychain or zipper fob in no time.
Another skill under his belt...
Jakob's flying eyeball


Meanwhile I finished off the installation with a couple switches.
The first thought was to have a hidden switch panel,
but this is a dashboard insert not a crown jewel.
custom 1940 ford dashboard and insert


There's a good excuse for all this hammering.
It's a great way to hide any polishing blemishes!
I could have spent 3 hours sanding and buffing out all the scratch marks,
then worry about scuffing it forever.
Instead this took about 5 hours and it'll camouflage all the hack marks!

Jaxon called me out on what had happened.
He said now the rest of the car needs to be this crazy.

TP